- Category
- What's New?
- FightSticks/Pads
- Joysticks
- Pushbuttons
- Spare Parts & Tools
- Hardware & PCB
- Electrical
- Customize
- Merchandise
- Sales & Clearance
- Brand


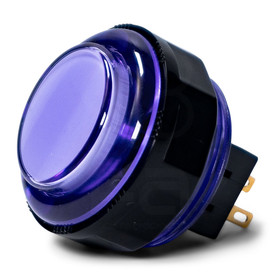
Seimitsu PS-14-KN 30mm Screw Button: Blue
Rating
Price:
$3.75 (USD)
Brand
SKU
SEIMITSU-PS-14-KN-B
Weight
0.50 Ounces
Availability
Ships within 1-2 business days
Shipping
Calculated at checkout
-
Product Description
The Seimitsu PS-14-KN arcade pushbutton is only second in popularity to the SANWA series. Available in several translucent colors, artwork can also be inserted under the cap of the plunger. and are sought after for their increased customization ability with joystick graphics and LED mods. Seimitsu buttons offer the same high-quality and responsiveness as a Sanwa, but a slightly different feel and sound.
Each comes with a screw nut, making it an excellent choice for both metal and wood joysticks. The buttons are compatible with MadCatz FightSticks, Qanba and Hori joysticks. The PS-14 KN uses the Seimitsu PS-14-G Button Micro Switch.
Black Screw Ring
The latest iteration of the Seimitsu screwbutton models now possess a black screw ring that is taller, more compact and easier to screw on. This helps the button navigate tighter spaces of some layouts. Additionally, the screw ring design more easily displays the proper orientation to screw in via small bumps at the top, which also help to grip the ring to a metal or wooden chassis.
Bundle with MM9-4 High Tension Button Spring and Save
By default, Seimitsu PS-14-G microswitch requires 1.0N or 0.2 LBF (pounds force) to each button.
The MM9-4-25N adds an extra .08 LBF (pounds force), for a total of 0.28 LBF. The result is a light, but firm button input requirement that accelerates its the button cap's return to neutral.
The MM9-4-50N adds an extra .16 LBF (pounds force), for a total of 0.34 LBF, resulting in a much firmer button input requirement that quickly pushes the button cap's to neutral position, ready for the next press.
This is desirable to some who appreciate using more deliberate input force and a bit less sensitivity than Sanwa's SW-68 offers. Now, you can save 25 cents off the regular price of the MM9-4 series spring when you choose one of the high tension springs from the options list.
Bundle with Silencer 30mm Foam Washers and Save!


")
Silencer is our 1mm-thick foam washer that helps to dampen the loud sounds common with tapping on the button plunger. It conforms to the internal housing of many Sanwa or Seimitsu-style 30mm pushbuttons.
Known compatibility:
Sanwa Seimitsu Crown Hori Click "Add to Order" to save 40% off retail of a Silencer foam washer for each button you purchase.
Silencer Installation
installing the Silencer foam pads into a Sanwa or Seimitsu pushbutton is straightforward. Place the washer - plastic film side down - into the button housing. Align the small tabs so that they stick out of the holes on each side of the housing. For Seimitsu PS-15, and Hori Hayabusa low profile pushbuttons, snip the tabs off with scissors and place into the housing.
24 vs 30mm When processing orders, a frequent mistake we found among new players is choosing the wrong size for action buttons, such as punch and kick.
Within the fighting game genre, Japanese arcade buttons commonly consist of two diameter sizes: 24 millimeter and 30 milllimeter (mm). In most configurations, 30mm represents your action button. These are front facing, appearing most prominent on your Fightstick control panel. Option button, such as "Start", "Select", or more recently "Option", "Touch", or "Share" are usually 24mm.
UPDATE: Owners of Neo Geo AES Joysticks will need 24mm pushbuttons instead of 30mm (Thanks SRK's DEZALB)
Below is a visual representation of a common Fightstick control panel. Throughout this article, we will mark 24mm in green, and 30mm in Orange.

Checking the Proper Size
 Another way that players can misinterpret the pushbutton size is by measuring the pushbutton plunger. Have a look at the diagram at right.
The plunger - the part that you press down to represent an input - is 25mm or a bit smaller in most 30mm pushbuttons. Often this leads to the conclusion that one needs a 24mm button and not 30mm.
Similarly measuring the button rim can lead to confusion, as it is intentionally larger than the button hole it is placed in. You don't want to use these measurements. Instead, review the button housing diameter, or the hole the button will be placed in. You can do this with a caliper - a digital caliper is often quite helpful for this and other arcade-related projects.
Control Panel Configuration
Most Fightsticks from MadCatz, Hori, Qanba, and similar will use these two sizes. How the buttons are used will depend on the model joystick that you own. Over time, we'll provide example configurations for specific popular Fightstick models and arcade cabinets using the color key for 24mm (green) and 30mm (orange). We'll also expand the key for future models if another size is introduced, and we offer for sale.


-
Product Reviews
-
Great alternative to OBSFs
Great button, more springy / tactile than a Sanwa OBSF. Still a sensitive button, but you won't be accidentally fat fingering these. Easy disassembly for whatever art you may want to put inside. Definitely recommended. Brian M on May 15th 2022
-
Great but pic is misleading
These are great, really clicky, they arent as clicky as the Crown/Samducksa buttons in my opinion.
These are worth a buy, install on 1/2 wood maximum width.
The pic is misleading because the inside center is Baby Blue, which is offputting for me, but I might paint the inside blue with a spray can. Julio on Jan 21st 2018 -
GREAT BUTTONS
Slightly less responsive than Sanwa. Good to learn combo without mashing. Tony on Dec 18th 2017
-
Great buttons.
Slightly firmer than Sanwas.
Buttons rise a bit faster and have a little spring feeling.
Resting your fingers on the buttons will not trigger them.
Buttons remain above the edges when pushed all the way down.
Easier to install than the snap ins and less riskier.
Middle plunger in the inside is white so it has a slight light blue look when glancing down at a bird's eye view. Unknown on Sep 10th 2017 -
Good button in lots of colors
I recently purchased four of these buttons for my custom TE2+. I actually only bought these in the first place because I wanted colored jewel screw-in buttons, but Sanwa does not offer them; all they have is solid colored screw-ins. Installing the buttons didn't really cause any problems. The threading can be a little finicky just like any screw-in button out there, but finding the thread is simple enough. I was under the impression from some info I found online that the screw-in mechanism would not inhibit installation in the light kick button position in a TE2+, but it actually ended up colliding with a component from the joystick. The Seimitsu screw-in mechanism takes up much less space than their Sanwa counterpart, but I ended up having to clip away a small bit of the metal plate which holds the joystick in place to accommodate the button. Unknown on Aug 13th 2017
-
Great Buttons, but......
So, these buttons are fantastic. They have great feedback when pushed, and they are not half as loud as the Sanwa buttons (which is either good or bad depending on what you want I suppose). The only real problem that I had with these buttons was the installation. For example. With all of the "snap in" buttons, they are literally just that, "snap in".
With these screw buttons, if you get the ring that screws them into the board off track, even just a little bit, they will get stuck, and you had better be prepared to either have your fingers bleed, or hope that you have the proper tools to get them corrected.
Also, it should be noted that if you are wanting to put these in a TE2+, it is a rather tight squeeze the closer to the stick you get, but totally doable. Unknown on Jan 17th 2017
-
-
Find Similar Products by Category